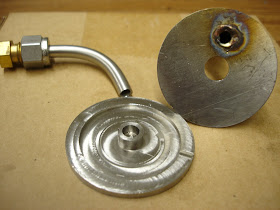
A short while ago, someone on a mailing list I frequent asked "Why TIG?". In context, he was asking why TIG is preferred over other forms of welding, such as MIG. The above picture illustrates one of the reasons. Keep in mind, I'm basically a rank amateur when it comes to welding...
Sunday, November 8, 2009
Friday, November 6, 2009
Frankenrocket
I've welded the torch igniter onto my current chamber. As you can see, its rather disproportionate ... a good example of "minimum gauge" issues. The igniter is built around the smallest reasonable orifice sizes (0.014") for the fuel, and the various design constraints lead to what you see here. It was dubbed the "Frankenrocket" by my brother ... and as such it will be known.
I hope to be able to test it this weekend, but in the meantime, I've been working on the next iteration of this engine. I'd like to get away from the igniter for obvious reasons and get back to direct spark. So with some cleverness, a 8mm thread plug, and a step up in my fab skills, I think I've come up with a very compact design that moves the spark plug back onto the injector face and still yields a much smaller engine. I've made a fair start, but I burned out some MOSFETs on the lathe, so I'm stuck waiting for Mr. Postman...
Tuesday, October 27, 2009
What does 100 bucks look like?
This:
From left to right, a standard platinum plug for my car, CR8HIX, R0045J, CM-6, R847, and ME-8. All of them except the first are NGK. All of the interesting NGK plugs are racing plugs and run about $25 each.
The ME-8 has a 1/4-32 thread and is TINY. It is basically the same size as an R/C glow plug. In general, it looks way too fragile and still costs twenty bucks. I'll be trying the R847 next.
Sunday, October 25, 2009
More Igniter Testing
As you can see in the photo, the NGK surface gap plug is holding up well. This is the first plug of its type I've used and you can see that it looks basically untouched after 30 firings or so.
I did some more testing of the igniter. As it turns out, it appears to have been running extremely rich before. I leaned it out some to get smoother operation and there is a big difference in the metal temperature. At the previous mixture ratio, the steel never glowed red.
Saturday, October 17, 2009
Fire again
Over the last couple of months, I've been testing direct spark ignition of my NOP engine. It works, but it can be flakey, and usually makes a rather disconcerting "pop" at ignition. I also tried RC glow plugs, but with standard currents and voltages, they don't provide enough power (i.e. heat to the coil). I think that with PWM you could control or set the power level to get the right wire temperature but that's a rabbit hole I didn't want to go down right now.
So, I finally decided to build a torch igniter. I've been testing various plumbing configurations, spark plugs, and orifice sizes and I think I've arrived at something that works fairly well. It accepts liquids for both oxidizer and fuel, which is nice. I'm not sure if other's torch igniters run on on gaseous oxidizer or not.
The next step is to weld it onto the motor.
Monday, August 10, 2009
Progress?
So, I was out of town for a week on my day job. But right before I left, I was able to try out the Omega amplifier that I bought. The good news is that it works perfectly. The bad news is that the signal it outputs has the same amplitutde as its power source, which in this case is 24V. My TTL counter on the DAQ board didn't mind the 24V one little bit. However, when I went back to use the A/D section of the DAQ, it didn't work. A quick inspection revealed burnt resistors... probably from trying to sync all the current from 24V. So, the board went back to the manufacturer. And I have a non-working test stand.....
I took the downtime as an oportunity to build a Thermocouple amp that I've had partially completed for a while. I now have a four channel amp that outputs 1 mV/degC from Type K thermocouples.
Still no fire...
Monday, July 27, 2009
Sucess is Bittersweet
Last night after ordering the Omega amplifier, I went to go put away all my electronics gear. Just for kicks, I thought I'd try to get the LM339 based circuit to work one more time. An Eddisonian inspiration led me to try grounding one of the magnetic pickup lines at the amplifier, and wouldn't you know it, the noise problems went away.
So, the circuit below seems to work perfectly in my application. To recap, I have the following
- A Cox AN8-4 turbine flow meter
- A magnetic pickup which outputs a 10 mV minimum peak to peak signal
- A Measurement Computing 1208FS
I'm sure that it never would have worked had I not bought the Omega unit.
Sunday, July 26, 2009
Make vs. Buy
I recently bought a nice turbine flow meter off Ebay. I was planning to use the counter on my DAQ board to measure the frequency of the turbine and convert frequency into flow. Unfortunately, the flow meter magnetic pickup turns out to have a millivolt peak to peak output and the counter expects a TTL (0-5V) signal.
So, says me, "Self, how hard can it be to cobble together some Radio Shack parts to fix this problem ..." After a little bit of work and a trip to the store, I ended up with a circuit that sort of works, based on a LM339 comparator IC. The schematic is below.
Now, this particular setup has a couple of features.
1) When the turbine is not spinning, the DAQ counter reads 60 Hz. This is actually not an issue, because 60 Hz is below the low limit of the turbine. I simply have to remember that if the DAQ board says the flow rate is 0.125 gal/min, its actually zero.
2) If i touch any part of the circuit between the DAQ card and up to and including the body of the meter itself, the DAQ counter reads about 20 kHz. This IS a problem, as the max frequency of the meter is about 1800 Hz. However, its not clear to me if this would be an issue in operation. I seem to remember something about grounding problems causing these kinds of issues....
Now for the point of the post. Omega sells a nifty little box that is designed to do exactly what I need in this case. It costs $70. So, should I have just bought one instead of futzing around with making my own? I mean, $70 is a pretty nice dinner for me and the Mrs. So far, I have about 3 hours into this tiny project. Call it 4 hours by the time i transfer the project from the bread board to a perf board and come up with some sort of enclosure. So, is the value of my time less or more than $17.50/hour?
Friday, June 26, 2009
And here it is ...
Tonight, I drilled the injector holes and welded up the motor. The injector holes were surprisingly simple to drill at 0.06", 0.022" and 0.013". I did find that the middle sized drill bits were only good for about 6 holes in the stainless.
With the exception of the spark plug bung, I'm very happy with how it turned out. Welding is definately simpler than trying to design, fab, and assemble a bolted joint.
Monday, June 22, 2009
Sunday, June 21, 2009
Its like watching paint dry ...
After running through multiple repair cycles on the injector head, I finally gave up about two weeks ago and started building another injector. The one I have was designed to be bolted on to the chamber. I used that design because I didn't have a welder and I thought it would be nice to be able to remove the head and swap it out. Since I now have a welder and have been practicing with stainless steel, I've since come to the conclusion that welding is a MUCH simpler way to go (which is the advice that John Carmack gave a while back). If you do end up swapping injectors, its really not a big deal at all to cut the old one off and weld the new one on.
The new design also moves the spark plug off of the injector itself and onto the chamber. This was done to free up the space and make the injector much simpler to machine.
While I don't quite hate stainless as much as Paul Breed, I do find that it is much less forgiving than other materials. The main thing is to simply be patient - use the recommended cutting speeds and feed rates which are an order of magnitude less than aluminum. On the plus side, it is showing me some bad machining habits that I didn't know I had.
Below is a picture of the part I finished today, the cover for the fuel manifold on the injector. Also in my hand are two ruined 1/8" cobalt end mills. One I simply broke from over-feeding (feeding to fast/too much force). The other one I literally cooked from over-heating. It still cuts, but it more closely resembles a ball-end mill :)
Saturday, May 2, 2009
Thermocouples
Still no testing to report but in the interest of keeping the blog alive, I thought I'd share a minor little tidbit.
If you want to measure the temperature of a metal part, say a combustion chamber, it can be hard to get a TC bead in good contact with the metal. A better approach is to actually weld the TC wires to the part. Through the magic of TCs, you can actually weld the two wires independantly. Tonight I thought I'd try it out on a piece of scrap stainless tube with the TIG welder my wife bought me last year.
It turned out to be much easier than I thought it would be. (Please ignore the practice spots :)
Tuesday, April 7, 2009
Magic Smoke
Progress is still crawling along at glacial speeds due to my day job. I have flowed propellants through the motor, discovered some leaks, repaired leaks, and reassembled. The motor is on the stand once again and awaiting time for testing.
Tonight while I was testing the ignition system to see if the trigger rate had any effect on spark quality, I was reminded of what I learned in EE lab - semiconductors run on Magic Smoke. If you let the smoke out, they don't work anymore.
I'm using an ignition module designed for small R/C aircraft engines from CH Ignitions.
After being triggered at 200Hz for 10 minutes or so, it suddenly stopped sparking. Because it was warm to the touch, I decided I would disassemble it and confirm that I had let the smoke out.
200 Hz corresponds to about 24,000 RPM in a single cylinder 4 stroke, so its not great surprise that it quit on me. I've also not lost much time because I originally (2 years ago?) bought two modules. And that reminds me of one of the things I've learned working on these projects - Always buy at least one more than you think you'll need.
Sunday, February 22, 2009
Where does time go?
I can't believe that Feburary is almost over. Due to my day job, I haven't had much free time to work on the new N2O-propane motor. However, today I finally finished mounting it on the test stand. I intend to test ignition and thrust levels using very short duration tests. After I've gotten that worked out, I will go through the trouble of adding the regenerative cooling to the chamber.
Tuesday, February 17, 2009
The Rest of the Story
Here are the results for the other two cases...
M 1.851
p 29530 Pa
rho 0.398 kg/m^3
T 258.4 K
V 596.4 m/s
Drag 1750 N
Cd 0.764
M 0.936
p 27640 Pa
rho 0.377 kg/m^3
T 255.6 K
V 300.0 m/s
Drag 327 N
Cd 0.596
Monday, February 16, 2009
Unreasonable Request
I offered to run some CFD for Paul Breed of a simple "rocket like" geometry - a 8" by 8' tube. I picked an arbitrary ogive nose cone and a bluff tail.
Here is the Mach number contour for the 150 m/s case.
The free stream conditions were:
M 0.468
p 27580. Pa
rho 0.376 kg/m^3
T 255.4 K
V 150.0 m/s
Drag 55.1 N
The calculated Cd is 0.40. 300 m/s and 600 m/s results to follow.